Wednesday, October 31, 2012

October Foodie Pen Pals


In the last few months, I have been participating in a round up called Foodie Pen Pals.  Basically each month I am pared with two people: one I send a package to, and the other sends a package to me. Once again this month my package came from Edmonton, Alberta. It was quite coincidental this month, my Pen Pal actually got involved because my Pen Pal last month  told her about it!

So what did I get this sweet October? All kinds of goodies!


 Some multigrain tortilla chips. I just realized I have not tried these yet! I will have to take them in my lunch tomorrow. I have not seen this brand around here, so I hope they are not to addictive! :-)


This litle pile is all gone! I love the Brookside berries, but they are quite expensive around here. The Nice & Natural is a new brand, and very tasty!! 


A tea mix and a lemon dill mix, two more things I have not found locally, but delicious!!


Homemade granola, and the recipe! Coincidentally  I also sent out home made granola this month...but this one is better with the bits of chocolate. I have been sprinkling a bit on my yogurt each morning, it is a nice boost of taste. 


When I saw this at the bottom of the box, I thought it was a little touch of booze...something I can't have right now. But then I looked closer and realized it is water flavouring! It is a nice and refreshing taste in your water. I have not seen this around her, either. 

That's it for this month! If you are interested in participating in November's Foodie Pen Pals, click HERE!! 

Happy Halloween, everyone!! 

~Natasha. 

Monday, October 29, 2012

No Sew Blankets

This year, I decided to make most of my Christmas presents. For all the little people in my life, I picked out this easy pattern of a no sew baby blanket. It was a link I found on Pintrest, and followed to THIS blog. I also used some ideas and hints from a pattern in THIS book.

Fleece is quite pricey around here, 16.99 a meter and up, ouch! Thankfully last month, about a week before we moved, a friend of mine heard about a sale. A good sale. The only catch was you had to have a store card, which cost 20 dollars. The fleece was on sale for 3.99 a meter, I figured it was worth the 20 dollars. Unfortunately, it was only the patterned fleece on sale, so I originally planned on making these double sided with the same pattern instead of one patterned and one plain as in the orginal. As you will see in a bit when I stop blabbering, I eventually changed that. So, I purchased 2 meters of 5 different patterned fleece, for about 50 dollars. Even with the 20 dollar card expense, we figured I had saved between 75 and 100 dollars. Wow.

So here is the super simple method of making a fleece blanket. I started out with the fabric we had picked for our nursery. I figured if I am going to screw up while learning, it best be on one I did not plan on giving away! Once again, the pattern was in inches, and while I started in Metric I finished in Imperial.

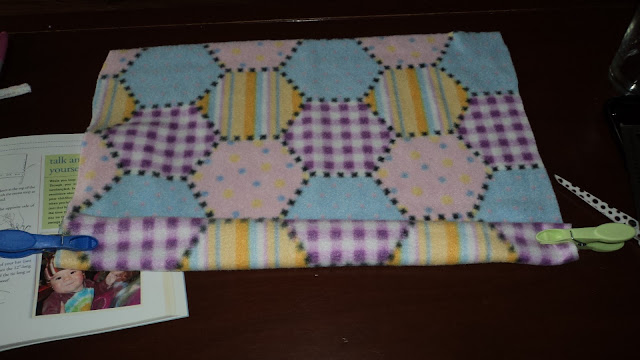
I started with a piece of fabric one meter square, as it was cut at the store. I forgot to take initial pictures, so this one is after a few steps. I had to cut off a white strip on two sides, so it is not quite straight and square. The pattern in the book said to cut a 5 by 5 inch square out of cardboard, and use that as a pattern to cut out the same from each corner of the fabric. There are going to be lots of scraps, so I plan on using them for a later craft.I did a lot of the first steps on the floor because my table is a bit overloaded right now. When cutting out the corners, I had a really hard time keeping 2 pieces of fleece together and even, so I gave up on the double sided blankets and decided to go single.


The next step is to cut strips one inch apart all along each side. I decided it would be easier to measure and snip, then fully finish the cuts.


I set a ruler on my fleece about one inch from the edge and just snipped a bit at each one inch mark.


It ended up working out well, The last one was just a smidgen bigger or smaller than the rest on each side. 


Finally, I went back and cut all the way up. I only did one side at a time, though.


The final step I started on the floor, but then got up and finished while I watched television. My fingers easily worked while I was absorbed into the show. I just grabbed each one and looped it into a knot.


 And the finished blanket. One fringe I ended up cutting off, it was in the corner on one side and I had accidently cut to close to the one beside it. I cut it off for safety's sake because with a good tug it probably would have come off, and I don't want baby to get that in her mouth!!


Now...only four more to go! It took my about an hour and a half work over two days to do the first one, so I should be able to make short work out of these!

Hope everyone is having a great day, and everyone who is in the path of this oncoming hurricane stays safe!

~Natasha.

Friday, October 26, 2012

Scrapbook Puzzle

This year, I am attempting to make all my Christmas gifts, or at least the ones for the grownups. It is hard to make things for the kids in my life, since I can not sew and they are either to you, or nor crazy for play-dough (weird, huh?) Anyway, this is the first of (hopefully) many crafts to come. I found this one on Pintrest, basically you take an old puzzle, usually a kid's one with nice big pieces, decoupage scrapbook paper to the pieces, then put it back together.


I started out with a simple enough Winnie-The-Pooh puzzle from the dollar store, 24 big pieces.


 It went well at first. A couple of the papers I had chosen were double sided or had more stuff in different spots. I used them twice, just putting them on different rows.


Almost done, one more row to go. I had some difficulties putting some pieces back together because of overlap, but I do not have an exacto knife to make perfect cuts. I just mashed them together the best I could.


Completed, I tried my best to vary between dark and light coloured paper, except for the xoxo one in the middle. After it was all together, I put more decoupage glue on both the front and the back. I plan on framing it but the one I have is to small, so I will have to find another.

It was a fairly simple project, but I did it over three days last week. I have lots of leftover papers, so I may make another one for myself or attempt to do it better with a smaller puzzle.

Happy Friday, everyone!!

~Natasha,


Tuesday, October 23, 2012

Snickerdoodle Cookies

Apparently Snickerdoodle cookies are my beau's favourite. His Grandmother made them for him when he was a kid. Hard to live up to that! Last year, I found a recipe for them, but he said they were to crunchy. So last weekend, I leaned on Google to try and find a perfect soft snickerdoodle recipe. I found a recipe on eHow.com, and made them while he was at his Dad's, fixing my car.

Soft Snickerdoodles.

2 sticks butter, softened.
1 tsp vanilla.
1/2 cup brown sugar.
1 + 1/4 cup white sugar, divided.
2 + 1/2 cup flour.
1 Tbsp cinnamon, divided.
1/2 tsp nutmeg, divided.
1 tsp baking soda.
1/2 tsp sale.
3 eggs.

Preheat oven to 350 F. In large bowl, cream together butter, brown sugar and 1 cup white sugar. Add eggs and vanilla, beating until fluffy.

In another bowl, combine flour, salt, soda, 1/2 Tbsp cinnamon and 1/4 tsp nutmeg. Add dry to wet mixture, blending until smooth.

In a small bowl, combine remaining 1/4 cup sugar, 1/2 Tbsp cinnamon and 1/4 tsp nutmeg. Roll batte into balls, dipping into sugar mixture before placing on cookie sheets. Flatten slightly using bottom of glass.

Bake 8 to 10 minutes or until lightly browned, Cool on sheets before removing to serve.

To keep cookies soft, store in a sealed jar or tin with a piece of bread laying on top.


The batter was very wet, I ended up adding an additional 1/2 cup flour, and still had to scoop and dip the cookies in the sugar. I could not roll them in balls, thus the funny shape of the one on the left.


I also found the nutmeg a bit predominant, but he said they were perfect! Woohoo! So that means i will probably be making them often!

I made these last Saturday, I replaced the bread last night (Monday) and they are still quite soft. They disappeared fast when they were freshest, but now I notice they are moving slower. Still, i am glad he liked them.

I am going to start a cookie rotation soon, I am just finding  a few more recipes. Since he started his new job we are both taking lunches now, and cookies pack well! This one is definitely going into the rotation!

Happy Tuesday, everyone!!

~Natasha,

PS: My spell check thinks snickerdoodles should be knickerbockers :-)

Tuesday, October 16, 2012

"No Sew" Baby Hat

Next month is full of baby showers, one for us and two others that I will be attending. I decided to make at least one part of the gift for one shower I am attending. I found this pattern for an easy no sew hat in a book called "Crafty Mamas: 49 fast, fabulous, foolproof (baby & toddler) projects"  There are a couple of projects I am hoping to make from it, but this is the first. The book is American, so all measurements are in inches, but I used both inches and centimetres to make this.

My first step was to get measurements. It told me to measure baby's head around the widest part and from the bottom of the ear to the top of the head. Or, instead, measure a baby hat. Well, I have neither yet, so I had to improvise. With a quick bunch of messages to my sister, I got a couple of measurements from my 5 month old nephew Cormac. I figured that would be a good size.

You need to start with a piece of felt 15 inches by 22 inches. Fold it in half lengthwise, keeping the fold to the left. Cormac's head, I'm told, is 43 cm around. The book told me to halve it (21.5 cm) and add half an inch. One inch is about 2.5 cm, so I added the 2 to make it 23.5 then just rounded up to 24. Mark and cut the excess off the right side.

Unfold the fabric again, then measure and fold up about 1.5 inches, and do it again to get a double fold. Pin.


I could not find my safety pins, so I used clothespins. Fold the hat in half again.


Here's where I strayed from the pattern. You are supposed to use eyelet pliers to punch holes up both sides and then 'sew' them with extra fleece. I do not have eyelet pliers and could not find a hole punch, so I folded it inside out and got out my needle & thread. I could not get a focused picture, but here is the one from the book.


This is where you use the second measurement. Cormac is 13 cm from bottom of ear to top of head, you take that measurement and add 2 inches. Easy. I basically eyeballed it and when I thought I had it high enough, i measured and marked it. It was easy to measure up 13 cm and flip the ruler over to add 2 inches, no math needed! You can just barely see the pink dot at the end of my sewing below.


Flipped back inside right, here is the seam running up what will be the back.


Next, you cut the excess vertically down, making a fringe. I though I would save time by tying then cutting. I was wrong and ended up untying and re-cutting it. Finally, gather the fringe and tie it off tightly with an extra piece of fleece.


I thought the fringe was to long, so after the first picture, I trimmed them a bit.


I have no baby to model it, so Kermit the Frog will have to do :-) His head s a bit small, so i went for the full face effect.


Ta-da! Now, let's hope it fits when baby comes!

It has been a busy weekend here, I made this, I baked a crazy amount for my Foodie Pen Pal, plus we went to baby classes all day Saturday and a couple hours Monday, and I spent three hours at the hospital Monday for a glucose challenge & blood work. So, even though today is Tuesday, to me it feels like Monday. Here's hoping the rest of the week goes by fast!!

Have a good week, everyone!!

~Natasha,

Wednesday, October 10, 2012

Pumpkin Painting

While waiting for the turkey and stuffing to cook Monday, my man K and I painted some pumpkins for Nanny. This is the story of our Pumpkin Painting adventure! 

First things first...a scary face! 


Next, I was told to paint a ghost. The one on the left is what I drew. I was told it does not look like Boo (from Mario) so with K describing him to me, I drew the one on the right.


Next, K wanted to draw Boo to! The red on top is his tongue. The red K on the left is actually an X. I was told "X marks the treasure" and the red dots going around the pumpkin is the trail to the treasure. The green dots are grass, of course.


Pumpkin #2. The first thing he wrote was the giant "BOO" in red. He then asked me to draw a goat. I though he misspoke and asked "ghost?", he said no, a goat. There is goat at the top. I had him spell goat for me and we labelled it. It is a tricky word (he guessed the A after a hint) and then K sung a song that he learned in school about those tricky invisible letters!


Kyristan next wrote his name below the Boo and then painted in the letters, He also drew a yellow snake (centre), another ghost (bottom centre) and a black moon (top left) because I had drawn a sun on the other side (seen above).


The second pumpkin was completed with some white spots and a smiley face by me.


This killed a bit of time before dinner was ready, by the time we were done and cleaned up it was time for Kyristan to help set the table. Thanksgiving dinner was delicious, and I really enjoyed my day out. Next year, we will have two high chairs for Thanksgiving, as our little Jellybean will be almost 11 months old, and K's baby brother Cormac will be a year and a half!

A hint for painting with kids (I learned when I went to college to work in daycare), put a dollop of paint into a cup and add about the same amount of dish soap, mix them together. It not only stretches your paint, but also helps with cleanup!!

Hope everyone is having a great week and all you Canadians had a wonderful Thanksgiving to!


~Natasha,

Sunday, October 7, 2012

Dump Cake

It has been a hectic week. Last weekend, we moved, finally! It has been a long week of unpacking, stacking and finding places to stash everything in a smaller apartment and a (much) smaller kitchen. But, the show must go one, and the day before we moved I had a potluck to attend at work.

On of my aunts told me about this quick recipe last Thanksgiving, so I finally got curious enough to research it, since it sounded super easy and I could make it in a disposable baking container. It is basically a fruit cobbler and sounds delicious when described. To make it, you will need a can of cherry pie filling, a can of pineapple (same size) a yellow cake mix and some butter. I had the butter and cherries, I got the pineapple and cake at Wal-Mart for 3 dollars the day before I made it. Cheap and easy!


Step one: Dump the cherry pie filling into the pan.


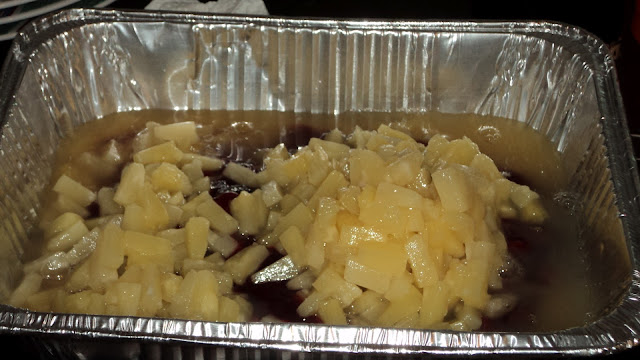
Step two, dump the pineapple, including juice, on top. I used 2 cans because around here they only stock small ones. All the recipes stated not to stir it, but i did a bit.


Step three: Sprinkle a yellow or white cake mix on top of it all.


Step four: Spread pats of butter over top evenly. I used Becel. Bake at 350 F for 45 to 60 minutes,until browned and your house smells yummy!


It smelled delicious and looked delicious, but I found it really rich. I ate a bit, and i know for sure two other people tried it (out of about 35). Myself and one of the others tossed half our servings and I ended up bringing about three quarters of it home.

I think it would be better if it was a different fruit combination. Maybe blackberries and raspberries. Or apples and pears. Something not so sweet. I might try this recipe again and experiment with it a bit.

Today is Thanksgiving here in Canada. Thanksgiving is a three day weekend here, so today we are going for turkey at his parent's house, and tomorrow my sister is hosting a turkey & ham dinner at our parent's house.  Dad complained there were no leftovers last year when I hosted Christmas, so we decided to make sure he got some this year. My mom said she bought two pumpkins for K to decorate so I am bringing paints, we can do that while his mommy is cooking and his daddy is looking after Cormac.

Hope everyone is having a good weekend, Happy Thanksgiving to everyone in Canada!!

~Natasha,

Wednesday, October 3, 2012

Down a Mountain


Mid-way down a massive hill on the Fundy Trail.
Taken September 23rd, 2012, mid-afternoon. 

Monday, October 1, 2012

September Foodie Pen Pals

In the last few months, I have been participating in a round up called Foodie Pen Pals.  Basically each month I am pared with two people: one I send a package to, and the other sends a package to me.This month, I got a package from Edmonton, Alberta and sent one to St. John's, Newfoundland.

My package from Lisa came Thursday the 20th of September, it was a rainy day and I was packing up my kitchen. We moved this past Saturday, so it has been an adventuresome month! Like me, Lisa is about 5 months pregnant, so she sent me some goodies that were both healthy for baby and delicious for me. I had to wait for the next sunny day to take my pictures, and I apologize for the poor quality, it has been a hectic couple of weeks!!


First up is a box of Pumpkin seed cheddar crackers. As you can see, I have already gotten into them. When the box came, I was mid-packing, and hungry! I thought they were granola bars, so i tore into the box! I was surprised when I found crackers! I was not feeling crackers just then, so i closed it up and dug further into my package, I have since tried the crackers, they are delicious and a brand I have never seen here, yum!


Next is a box of Mandarin Orange Spice tea, I love the smell! I have not opened it yet, I am saving it for my new kitchen (and my kettle was and still is packed, the downside of moving).


Cashew Carrot Ginger soup, it looks delicious, but again, I have not had the chance to get into it. The next rainy day (so looking like Wednesday), this will be lunch! I have not seen this brand around here either so I can't wait to try it!


And finally, a dark chocolate bar, some recipes for my new kitchen, a painting and a CD! Here is a link to Lisa's Music webpage http://www.lisanicolegrace.com/, check it out!

Well, that's it for this month, I am still debating on participating in October, where everything is such a mess right now due to moving I'm not sure if I will have time, so if not I can't wait for November to get more goodies!!

If you are interested in participating in October, click HERE!


~Natasha.


The Lean Green Bean